Fleece Documentation
- Features
- Foreword
- Using the Fleece Editor
- Getting Started
- Importing Fleece to Unity
- Reimporting Fleece to Unity
- Opening the Editor Window
- Creating Links between Passages
- Navigation
- Using Folders
- Adjusting settings
- Tips & Tricks
- Localization
- What are Jumpers?
- What is a Drawstring?
- What is a Parser?
- JSON Backups
- Exporting to and Importing from CSV
- Overridable Tags
- Internal Functions/Tags
- Scripting Reference
- FAQ - Why are character names/portraits parsed by a drawstring, not by the parser class? - What makes this different from another dialogue system? - I'm using the Generic Jumper, but text isn't updating! - I'm using a custom Jumper, but text isn't updating! - Unity is crashing every time I open the Fleece editor window or open the inspector of an object with a Jumper! - I can't see links, colours, or the delete button in the passage inspector! - Help! My custom jumper keeps saying "Assertion Failed"?
- License
- Known Bugs
- Changelog - v1.0.0 - v1.0.1 - v2.0.0 - v2.0.1 - v2.0.2 - v2.1.0 - v2.1.1 - v2.1.2 - v2.1.3 - v2.1.4 - v2.1.5 - v2.1.6
Features
- Full Unity integration. Jumpers make it easy to reference dialogue, whether you're making a dating simulator, rail shooter, or both!
- In-unity node-based editor. All game dialogue is kept in one place.
- This node-based editor also features folders and easy-to-create links!
- Built-in tags for parsing if statements & inserting & setting variables. Programmed to be able to plug into any kind of data system, not just the included one!
- Extensible custom command tags, for doing game-specific actions like switching scenes in a VN.
- Built-in localization support. Different languages can even have different logic and additional passages attached.
- CSV import & export for editing a story externally, spellcheck, and localization.
Coming soon...
- List view
- Bring external application editor out of experimental!
Foreword
Hey! Thanks for using Fleece! In this documentation I'll be detailing how to use Fleece as intended.
Fleece was designed to be more... soft-coded, rather than hard-coded than other dialogue managers. It was originally developed to be used for a game that featured both a rail shooter segment where dialogue would pop up as the player flies through invisible triggers, and a dating sim segment where dialogue would follow branches like an interactive visual novel. The design I settled on allows for all dialogue/text in a game to sit in one place, and be accessed in multiple, different ways throughout a game. The major focus of Fleece was "integration", and the "Jumper" class is the end result of this goal. It lets you reference a passage in an easy way, and lets you edit dialogue on the fly outside of the editor window itself. If you need to view it in the editor window, the class even has a "ping" button on it that instantly selects it in the editor window!
If you're having trouble integrating Fleece in your game's situation, please feel free to email me through my website, kaiclavier.com, and I'll help you figure it out!
Using the Fleece Editor
Getting Started
Importing Fleece to Unity
First thing's first, you need to import Fleece into Unity! Either download and import the passage from the Unity Asset Store, or drag in the .unitypackage file from itch.io. From there, a dialogue will pop up with a list of all files within the package. Everything should be imported, but the Sample and Documentation folders can be excluded if you're trying to save space.
Reimporting Fleece to Unity
Just a note for when you update Fleece, make sure the files you impport aren't overwriting important files like your custom settings or your stories! That's why in the following instructions here I tell you to create a new story, not use the sample one. So... uncheck settings when re-importing, and if you need to rever it to its default values, you can do that by clicking the gear in the top-right of the settings inspector. I always reccomend doing a JSON backup before updating, though!
Opening the Editor Window
To open the Fleece editor window, find Window/Fleece in Unity's title bar.
Create a new story with Assets/Create/Fleece/Story. Assign this new story to be the active story in the Fleece editor window.
Right-click anywhere on the grid to open a context menu. Select "New Passage" to create a new passage.
Now you've got your first passage! Click on this passage to open it up in Fleece's inspector, the panel on the left side of the Fleece editor window. You can alter the title, text, links, and color of a passage from here.
Creating Links between Passages
After you've got a few passages, you might want to assign links between them. There are two ways to assign links, you can either click "create link" in Fleece's inspector and assign a connected passage to a link there or... Right clicking a passage will reveal another context menu. Select "Create Link" and then left-click on the passage you want to link to quickly make a link to another passage.
Navigation
Middle click & drag to pan around in the editor! You can also use alt + left click for this action. If useAltToPan is enabled in the settings, you can just use the alt button to pan, too!
Double click a folder to enter it! Double click on an empty area to go up a folder.
Right-clicking in the node view will open up a context menu. This menu will have different options based on if you click on a passage, folder, or nothing!
Going straight to the root folder!
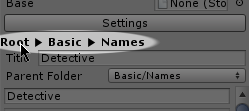
You can go up multiple folder steps with the "folder chain" in the fleece inspector.
Drag on the background to multi-select passages & folders, allowing you to move multiple at the same time.
Using Folders
Create folders to organize your passages! You can move passages into a different folder either by selecting the parent folder in the passage inspector, or by dragging it into one. If "show parent folder" is enabled in settings, you can even drag passages out of a folder by using that.
Adjusting settings
Make sure the dropdown in the top-left corner of the Fleece editor window is open, then click "settings" to open up Fleece settings in Unity's inspector!
Tips & Tricks
Note Passages
You can change the available passage colours within the editor settings! These colours are ID-based, so you can change the value of a colour after assigning one to a passage. You can use differently-coloured passages for different things in your project. Why not use blue to denote a passage as an editor note? No one said all the text within fleece had to be just for your game!
External Text Editor
This feature is currently experimental, but if you enable "show external text editor" in settings, some buttons will appear in the passage editor. Clicking "open in editor" will open the passage's text in an external editor (notepad.exe by default) and clicking "load from editor" will take any saved changes back into that passage's text.
This can be useful because Fleece doesn't have spellcheck, and even though the settings let you resize the text in Fleece's inspector, you might prefer to leave the text at its default size and edit in a more robust editor.
Right now this feature uses System.Diagnostics.Process.Start() to run this process, and not all editors support this. If someone has a more universal solution that could work on both windows and mac, please let me know!
Localization
Your story is done!
So you've finished writing the story for your game and got all dialogue systems in place. Oh no, you forget to set up localization tools! Well hey... Fleece has your back on this from the beginning.
For the sake of example, lets say you wrote your initial story in English and want to translate your story to... Pig Latin. Here's how to get started:
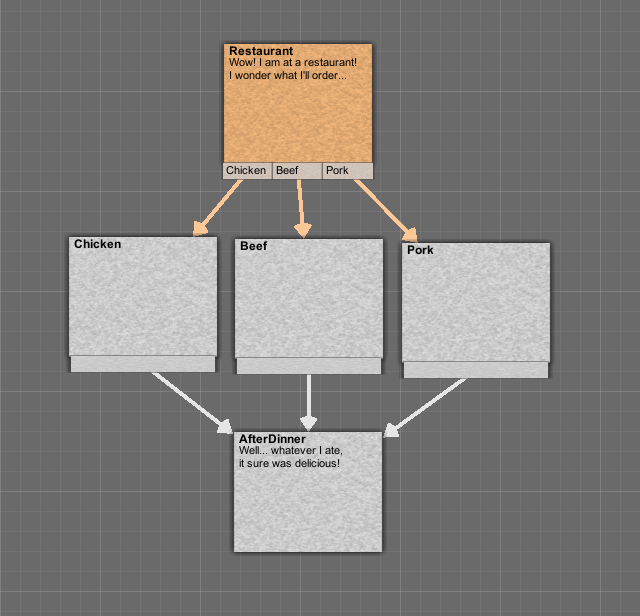
Create a new story (pig latin) and assign it as Fleece's active story. In Fleece's inspector, below the active story field, there should be a field for a "base" story. Assign this value to your original story (english)!
Translucent passages will appear, these are "imported" from your base story. Awesome, now your Pig Latin translation has all the passages in place, but all the text is still English. So...
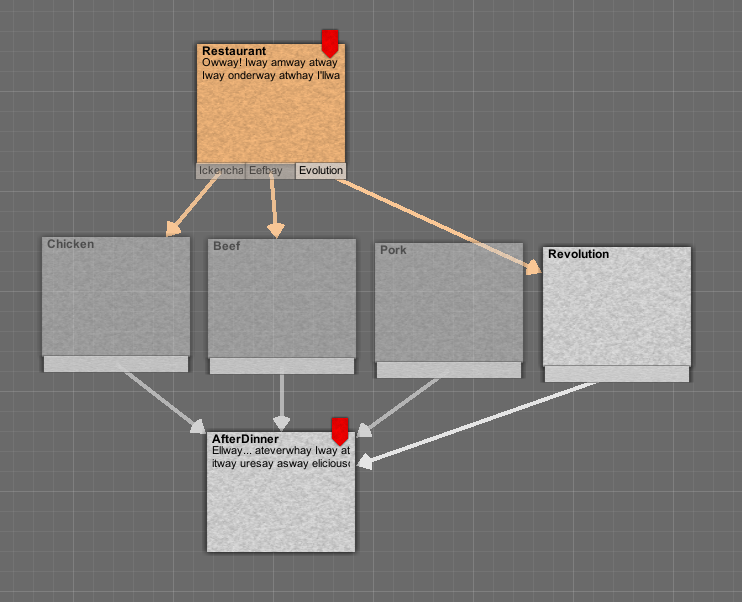
Click on these passages to open their inspectors like you would with a normal passage, and you'll notice it has some additional toggle fields (checkboxes). If you click these checkboxes, it'll let you override different passage values! Passages marked as overrides will gain a "banner" to show this.
That'll teach 'em!
So now you've got your game translated to Pig Latin! But before you can publish your game, you get a letter from Ancientway Omeray (stay with me here) saying that the choice in your game to order pork at a restaurant directly violates section 3 subsection 5 of pig law, and therefore your game cannot be published in the country until this is remedied. While a full revolution to dethrone the triumvirate is ideal, the more immediate solution is to find the problem link in your story, override the links on this passage, and prevent the choice from even showing in the first place! In addition to this, in the "Pig Latin" story, you can absolutely add brand new passages and have those linked to imported passages! So maybe while removing the "pork" option, you add a new link for "revolution"... that'll teach em!
Right! And to actually change your story mid-game, just set Story.settings.activeStory to the new story! If you plan to let players do this mid-passage, please look into Drawstring's Restore method.
What are Jumpers?
So now you have your entire game's story written. Or at least part of it. But now you're probably wondering, how do I actually get the text from a passage into my game? The best way to do this is with a nifty class I call the Jumper.
Jumpers are the cornerstone class of Fleece. They can also be called "Passage References" in a pun-free environment. The idea is that instead of having code like this:
public string myString;

void MyCommand()
{
    Debug.Log("The dialogue here is: " + myString);
}
You can instead have code like this:
public Jumper myJumper;

void MyCommand()
{
    Debug.Log("The dialogue here is: " + myJumper.passage.parsedText);
}
This provides a connection back to the text you have in your story! And to assign that connection, the Jumper class has a very special appearance when put in a Monobehaviour:

This is what a Jumper looks like!
The text being shown in a Jumper is the exact same text shown on the referenced passage within the Fleece editor. If you have a passage open in both a Jumper and the Fleece editor and edit one, you'll see the text in the other window update immediately!
This can be especially helpful for certain kinds of games, you could add a Jumper to an "NPC" class for instance, and write dialogue for that NPC directly from the attached script. If there is no passage being referenced by a jumper, a button to create a new passage will appear instead of the text field!

Folded to save space.
If you click the foldout arrow on a jumper, you can collapse it to save space in the inspector. It basically just looks like a normal string at this point!
Included with Fleece is a file named GenericJumper.cs. This is a simple class with just a Jumper and a UnityEvent that sets text on it. This class alone should be good enough to do simple text replacements for things like menus, and the UnityEvent it has can set text to a Text Mesh, UI Text, or even my own text rendering asset, Super Text Mesh!
So when you want to reference text from a passage, use a Jumper! ALternatively, you can use Story.Find(), but I'd recommend against it.
What is Pinging?
The right side of a Jumper contains a button with a star in it. Clicking this button will "ping" the attached passage in the Fleece editor window. What this means is the editor window will open, select the passage that was pinged, and centre the view on it!
What is a Drawstring?
Drawstrings are another incredibly important class in Fleece, and are used to carry out "dialogue box logic" in a game.
Let's say you had a passage like this:
Name
---
Introduction

Text
---
Dev: Welcome to my game!
Dev: I hope you have a great time!
Dev: By the way, what do you want for dinner?

Links
---
1. Pizza!
2. <<if $!hasEaten>>Two Pizzas!
3. I'll skip out on dinner, thank you.
A drawstring can be used to get that text one line at a time, change a name box to match the name of the character speaking (in this case, "Dev"), and then when the passage is out of text, either go to another text box, show choices the player can make, or close the dialogue box. It will even not display links that don't have text in them. (If the $hasEaten variable is true in the example, link 2's text will evaluate to an empty string and the Drawstring will know not to include it as a choice.)
Fleece's samples include different drawstrings that are extended from the base class differently to work for different scenarios. Check out the sample scenes!
What is a Parser?
A parser is a scriptableobject that Fleece uses to modify text before it gets sent to a text renderer, and it effects all drawstrings/jumpers in your project. The "parsedText" area in the passage inspector shows what text will look like after it's been parsed! There is always one global parser in your project, referenced by settings.parser. To do parsing on a per-dialogue-box-basis, look into drawstrings instead!
The primary use of parsers is to be used together with overridable tags. The idea is... extend the parser class, and then change what collection of variables is actually being used for evaluations! DefaultParser.cs has an example where data is sotred in multiple lists, for instance. But one could write a custom parser that gets/sets from another system, like PlayerPrefs for instance.
This is programmed this way so you're not stuck using just one variable system for your game. Even though Fleece supports custom commands, using something like <<if $playerStandingOnTable>> instead of <<isPlayerStandingOnTable()>> is a-ok! You could even extend a parser to check multiple data systems! Whatever data you need for dynamic dialogue in your game.
JSON Backups
When using the Fleece editor, you might have noticed a "JSON" field. If you click the "new" button, a .json file will be created in the same directory as your story. Clicking Save/Load will save/load your story from JSON, saving directly to this file! Besides just being a "safe" copy of your story, saved directly to your hard disk rather than stored in Unity's memory, it has a few additional uses.
Using JSON for safer updates
When updating Fleece, I'd strongly recommend doing a JSON backup of your stories before updating. (Also do a full backup first, it's way safer!) Since this section is about future updates, I'm just writing this from past experiences, but... if some parts of Fleece's story format were to change, loading a JSON backup after updating may provide a safer update.
Using JSON for merging source control
Lets say your story has more than one person writing dialogue, or you have another team member that adds dialogue to your story in some way, maybe a menu. You go to push your multi-chapter story update to git and get hit with a merge conflict between your story and your teammates! Both of you made changes to this story, but since stories are just scriptableobjects, git can't figure out how to merge them. So if you were to perform a JSON backup of your respective stories before pushing... any source control tool should be able to see how the two files can merge!
After merging the JSON files, you'd have to load the JSON back with the load button to update the story's scriptableobject.
The only major conflict than can arise from this is overlapping IDs. By default, Fleece generates an ID for a passage that ranges between 1 and 9999999. On the very rare instance that the same id got generated for two passages during a merge like this, Fleece returns an error pointing this out.
Exporting to and Importing from CSV
If the top-left drop-down is open, a similar interface to the JSON backup interface will be shown. This can be used to export and import Fleece stories to a CSV file, to be edited by external tools. The main purposes for this are external localization and spellcheck.
Within settings, there are several variables that control which CSV columns are included/excluded in order to to improve readability, save space, or prevent certain fields from being edited. For example, you might want to disable the link id column when exporting for localization so translators don't accidentally change your programming.
Here's a list of every column, its primary use, and whether or not changing it in the CSV file will effect re-import or not.
| Legend | |
|---|---|
| ! | Changes made in CSV are brought back into Fleece |
| ? | Able to be disabled in Settings |
- id
This is the identifier for a passage. Do not change this value, it is used to sync the CSV back to the story upon reimport. - notes [ ! ? ]
Intended to be used as localization notes, but any notes can be put here. Any changes will be imported back into fleece. - folder name [ ? ]
Used for organization and sorting. Changes are ignored. - color index [ ! ? ]
Syncs up with the colour of a passage in Fleece. Can be used to mark finished status of a passage when localizing. Changes will be brought back into Fleece. - title [ ! ? ]
The title of a passage. Changes made will be applied back in Fleece. - text [ ! ]
The raw text a passage contains. Changes made are applied back. - link id x [ ? ]
The id of the passage link x links to. Changes made are applied back. This typically should not be changed, but can be used to change the destination of a link to a different passage. - link title x [ ? ]
The name of the passage link x links to. This is just for organizational purposes, and any changes will not be applied. - link text x [ ! ]
The raw text of link x. Any changes made will be applied back.
When exporting a story that inherits from another one, more columns are available that show the text from the original story. None of these values are imported when bringing a story back to Fleece.
- original title [ ? ]
- original text
- original link id x [ ? ]
- original link title x [ ? ]
- original link text x
When editing a CSV, the order columns/rows are in can be changed however you want for ease of editing, excluding the top row with the header names. This header row must be the top row when importing a CSV back into Fleece.
New passages and links can be created externally with a CSV, but unique ids will need to be manually generated and assigned. Links with empty text fields cannot be created this way. A new link must contain at least one character to be recognized as a non-empty field. If you wish to create new passages/links with this method, I suggest making all manually-created ids be a number that's higher than the "id max" variable in settings. So if this max id value is 99999, you can manually assign ids starting above that value like 100000, 100001, 100002, etc.
Upon importing a CSV, removing a row will NOT delete a passage, it will leave any existing passages in your Fleece story intact. If you wish to delete a passage, change its text field to "<<DELETE>>", rather than removing it. This "delete" string can be changed in settings The same goes for pre-existing links, to delete links, change their respective "link text" fields to this value. You can also use "<<EMPTY>>" to set a text field to be an empty string in a similar manner. This can be nifty when creating new links with no text in them.
New imported passages will be put inside a new folder inside the root folder at position (0,0) with the title "CSV Import [yyyy-MM-dd h:mm tt]".
Remember to perform a JSON backup before doing a CSV import just in case something doesn't go as planned!
Overridable Tags
The variables referenced by these tags are run through the parser class. Check that out in the scripting reference to see how to override functions correctly!
If a tag is on its own line, that line will be cleared. And since drawstrings skip over empty lines, that line will be ignored by a dialogue box! THat means you can have a block of text like this:
Kai: Check this out!
<<if $needsToSeeText>>


Kai: Dialogue will advance straight to this...
<<endif>>
Kai: Or jump straight to this!
...And still expect dialogue to flow normally!
Variables
To classify something as a variable, put a dollar sign in front of it like $this! This will tell your parser that a certain block of text is to be treated as a variable. Variable names can only contain alphanumeric characters and underscores.
You can also specify a negated variable like $!this or $-this! This can be used with bools to return an opposite, or with integers to flip the sign!
Operators
Supported operators at the moment are...
| Name | Symbol |
|---|---|
| To | = / to |
| Equal | == / is |
| Not Equal | != |
| Less | < |
| Greater | > |
| LEqual | <= |
| GEqual | >= |
Keep in mind, the operators that can be used all depend on the active Parser!
If Statements
<<if #myVariable>>
<<if $myVariable == true>>
<<else if $myVariable <= $otherVariable>>
<<else>>
<<endif>> (End of string is used as endif if none is found)
If statements cannot be nested at the moment, but else ifs can be chained for as long as you need.
Here's how a long if statement can look:
Your health is looking...
<<if $playerHealth <= 0>>
Uh oh!
<<else if $playerHealth < 3>>>
Find a health potion!
<<else>>
You're fine!
<<endif>>
An if statement like this could be handy for hiding dialogue options in links:
<<if $gold > 5>>
I want the cool sword!
And you can still have single-line if statements:
Dev: Hey Player! <<if #TalkedToDev>>Good to see you again!<<else>>Nice to meet you!<<endif>>
If you use an if statement like <<if #PassageName>> or <<if #PassageID>>, this will check if a passage has been visited in your story so far. Check out the section on the Visited Array for more info.
Insert Variables
<<$myVariable>> will insert a variable into a string.
You can also insert a boolean evaluation (good for dynamic links!!)
<<$myVariable > $myOtherVariable>>
<<$myVariable <= 5 >>
Can be used to insert a variable as a string.
<<!myVariable>> will still insert a negated boolean.
Example:
Your health is <<$PlayerHealth>>!
If $PlayerHealth is 5... when parsed, this string becomes:
Your health is 5!
Set Variables
<<set $myVariable = value>>
<<set $myVariable to $!otherVariable>>
Like other tags, if the set variable tag is on its own line, this line will be cleared. This can be incredibly useful for setting values between dialogue or at the very start/end of a passage! If a set variable tag doesn't have any text after it, set will be run before box closes. You can have single OR multiple set tags at the end of a passage to call all events at once, even if they're on seperate lines!
Dev: Thank you for visiting my store! Bye!
<<set $visitedStore to true>>
...But this is not reccomended at the end of passages with more than one link, as this will cause the box to be empty when links are shown. I'd highly reccomend putting these set tags at the beginning of the following passage instead!
All functions are called when a line is read, so it's suggested to put set at the beginning of a line, but not neccesary. The following text will work, it's just a bit disorganised.
Dev: Welcome to my store! <<set $visitedStore to true>> How can I help you?
Both "to" and "=" can be used as the operator here, whatever works better for you! Internally they are counted as the same value.
Also, to set a value to an empty string, just type it up like this:
<<set $myVariable to>>
Custom Commands
<<myCommand()>>
<<myOtherCommand(arg1,arg2)>>
To use custom commands, you must edit/extend the "RunCommand()" function of a Parser class (Or alternatively, Drawstring.RunFunction()). Check out the RunCommand() function in DefaultParser.cs for an example, or FleeceVisualNovelExample.cs for a robust example with Drawstring.RunFunction().
The placement rules of custom commands are the same as <
Within Parser.cs there are default custom commands, <<visited()>> and <<!visited()>>/<<notvisited()>> that will return either True or Face depending on if a passage has been visited or not. Check out the section on the Visited Array for more info. Make sure to call base.RunCommand() when extending the parser so these are still called.
Some of these examples include commands that work together with whatever variable system you have hooked into your parser, such as the add and mul ones, so extending get/set is entirely possible. Don't worry, you can still insert text in place of your commands, too!
Don't know whether to extend a Parser or a Drawstring? Think about it like this: If the function is global or will be primarily used for inserting text into a string, put it on a Parser. If the function is unique to a single type of dialogue box and/or needs reference to a monobehaviour and/or will be primarily used for making something happen in your game, put it on a drawstring!
Internal Functions/Tags
Insert Passage Contents
<<#passageID>>
so...
<<#20190325>>
This will insert raw text from one passage into another, similar to the insert variables tag. You can easily get the ID of a passage by right-clicking it in the Fleece Editor Window and selecting "Copy ID to Clipboard".
You can also use a passage's name, but this isn't advised since a passage name can be changed. It is convenient, though!
<<#passageName>>
so...
<<#CharacterName>>
This will still work with folders, as explained earlier in the documentation! <<#Names/CharacterName>> <<#/Home>>
You can chain these as much as you want! Fleece will automatically insert an error tag instead if you try to create an endless loop.
<<if #PassageName>>
<<if #PassageID>>
These can be used in place of variable if statements to heck if a passage has been visited in your story. Check out the section on the Visited Array for more info.
Scripting Reference
Story
This class represents a single translation of your game's entire catalog of text, from menu text to dialogue text. Fleece is intended to be used in this manner, so having multiple stories representing different pieces of dialogue rather than different languages isn't the intended use, but not entirely impossible.
Methods
Find
Returns a passage.
Passage Story.Find(int id)
Search for a passage by ID. This is typically the more reliable option since a passage's ID should never change, while a name can. You can easily copy a passage's ID to your clipboard by right-clicking it in the node view and selecting "Copy ID to Clipboard".
Passage Story.Find(string name)
Searches for a passage by name.
You can use forward slashes to specify the folder a passage is in. For example, lets say you have your Root folder and a folder named "World1". Both contain a passage named "HOME"...
Find("HOME") could potentially return either passage, whichever one comes first in the list that stores passages.
Find("/HOME") will always return the passage in the Root folder.
Find("World1/HOME") or Find("/World1/Home") will return the passage in the "World1" folder.
That aside, searching for a passage by name can be unreliable as passage names can change, so watch out when using this! You should try using the Jumper class to reference passages when you can.
Settings
Change the variables here to alter the Fleece Editor Window in various ways!
There should only be one settings file in your project, within Resources/FleeceSettings.asset.
When changing styles, press the settings button in the Fleece Editor's inspector again to refresh styles in the fleece window.
Properties
id max
This is the maximum ID that fleece can generate. When a new passage/folder is added to the editor, a random number that hasn't already been used between 1 and this value will be generated. If you run out of IDs, this number will automatically increase.
Passage
Passages are nodes that contain text and links! You can use them in many ways, not just for storing dialogue. You could store development notes in them, or put single words inside them to reference with passage tags!
Properties
text
string Passage.text
Returns the text stored in this passage.
parsedText
string passage.parsedText
Returns the text stored here after being run through the Parser.
links
List<Link> passage.links
List of all links attached to this passage.
Folder
This class is used internally.
Link
Properties
text
string link.text
the text attached to this link
parsedText
string link.parsedText
the text attached to this link, after being parsed.
passage
Passage link.passage
will return the passage this link connects to, if any.
Jumper
Jumpers are the cornerstone class of Fleece. They can also be known as a "Passage Reference" to put it in more blunt terms. Using Jumpers together with monobehaviours is essential to using Fleece effectively.
Interfaces
IJumperValidateable
interface IJumperValidateable
If a class with a jumper on it uses this interface, the ValidateJumper() method will be invoked whenever the Jumper or story updates. This isn't neccesary to use jumpers, but I would highly reccomend it. A monobehaviour must contain the method ValidateJumper() with this interface, and also must have [ExecuteInEditMode] at the start of the class. Check out JumperSample.cs for an example of how to implement this interface. And yes... as of 2019-10-12, I realize this might be a typo. Think of it as "validate-able", then!
Properties
passage
Passage Jumper.passage
This will get/set the passage on this jumper, using a stored ID.
id
int Jumper.id
This is the passage id that this jumper will reference. It's recommended to set passage instead of id through code.
Drawstring
While a Story contains text and its relationship to one another, a drawstring can be used to interpret those relationships. It contains the tools needed to parse through chains of dialogue one line at a time, and interacts with other Fleece classes such as the visited array.
The basic usage is as follows...
Begin(atThisPassage), Continue(), and MakeChoice(choiceInt) return a string meant to be sent to a dialogue box. Calling one of these methods will advance through the passage and return the reached text.
GetChoices() returns a string[] either containing the parsed text of all available links on the current passage if the end of the passage has been reached, or an array with a length of 0 if the passage still has text in it. This tells you whether MakeChoice() or Continue() needs to be called next.
By default, drawstrings will follow a specific logic, but this can be overridden by overriding the Begin() and/or Continue() methods.
The default logic works as follows:
Begin(atThisPassage)is called, defining the starting passage.- If the found passage exists... If this passage does not contain text, follow the first link that evaluates to "True", defaulting to the final link. Go back to step 1. If there are no links, return an empty string. If the passage contains text, parse text and return all text that came before a linebreak.
- Call
GetChoices()when text is done reading out, or whenever you want to show choices/continue prompts. If the returned array's length > 1, useMakeChoice(thisChoiceInt)to follow one of the named links. Check for length > 0 if you still want to display a single choice! Otherwise, useContinue()to advance. MakeChoice()orContinue()will return a string meant to be sent to a text mesh. If there is no text left and no links to follow, an empty string is returned. If a link was followed, automatically goes back to step 1 with the destination of the link, unless the destination passage is null, in which case an empty string is returned.
If an empty string is returned at any point, this means the drawstring is out of text and you should close the dialogue box!
When showing links, the returned array will only show links that have text in them. This way, you can hide a link with an if statement!
This means you could set up a system like...
An NPC has a Jumper referencing a passage named "Bob" that has no text on it.
"Bob" has two links. The first one is <<$day == 0>>.
So... if the variable "day" is 0, Begin(link0passage) will get called.
Otherwise, it will default to the second link!
If you want to show a link but still have it unavailable, look into using custom commands! Something like <<disableChoice(ifThisVariableIsFalse)>> could be used.
Check out the included example to see how to extend the Drawstring class!
Methods
Begin
virtual string Drawstring.Begin(Passage startPassage)
Calling this tells the drawstring to start reading from a specific passage and do the same as Continue(), returning text to be sent to a text renderer.
Continue
virtual string Drawstring.Continue()
After Begin() is called, this will parse text for tags, and return all text before a linebreak, skipping over whitespace in text. Check out FleeceDialogueExample.cs to see how this can be used!
GetChoices
string[] Drawstring.GetChoices()
Invoke this when your text is done reading, or when you want to allow a player to use Continue() or MakeChoice(). If the returned string[] has a length of 0, Continue() should be used. If the length is > 1, MakeChoice() should be used. If it's 1, it's up to you if you want to show a single choice, or continue!
The returned string[] will contain the parsed text of all available links. If a link is evaluated to have no text, it will NOT be included in this array.
MakeChoice
void Drawstring.MakeChoice(int choice)
This calls Begin() for the chosen link. The integer used here is relative to the array returned by GetChoices().
Events
RunCommandEvent
bool Drawstring.RunCommandEvent(string command, string[] args, bool appIsPlayingAndExecute, Parser parser, Passage passage)
Similar to Parser.RunCommand(), but done on a gameobject basis. MUST return true only if a command is executed, and MUST return false if no command is executed. Intended to be used only during play mode. Subscribe to this using OnEnable() and OnDisable(). Check out the sample scripts of you don't know how to do this!
Extra Methods
Restore
void Drawstring.Restore(int oldPassageId, int oldTimesContinued)
This sets the passage to one with the matching id and calls Continue() multiple times to restore to a mid-passage state. Meant to be used for saving/loading in conjunction with backing up referenced variables when a new passage is read, or when switching languages mid-passage. When reloading data, this method assumes you are restoring all data prior to calling this method. No fleece tags (Things between <<>> tags) are excecuted when using Restore().
Extra Parameters
timesContinued
[Read-only] int Drawstring.timesContinued
This counts how many times continue was called on the current passage. This is only used for Restore().
Parser
Parsers are a type of scriptableObject used to parse text before it reaches any dialogue box. The global parser can be changed in Story.settings.parser. To parse text on a per-dialogue box basis, look into using the Drawstring class, instead!
Methods
All useful methods in the parser class are tag evaluation methods that can be overridden. A custom parser will take this data from a tag and decide what to do with it.
Evaluate
bool Parser.Evaluate(string arg0, bool negateArg0, Operator op, string arg1, bool negateArg1, bool arg1isVariable)
Used to evaluate if statements.
StringValue
string Parser.StringValue(string arg0, bool negate)
Used to insert variables as a string.
SetValue
void Parser.SetValue(string arg0, Operator op, string arg1, bool negateArg1, bool arg1isVariable)
Used to set a variable to a new value.
RunCommand
void Parser.RunCommand(string command, string[] args, bool appIsPlayingAndExecute, Drawstring drawstring, Passage passage)
Used to run custom commands. Can be used to... insert text, run a script, do math, anything.
Use Drawstring.RunCommandEvent instead if you want to do gameobject-specific commands, rather than universal ones.
CustomParse
void Parser.CustomParse(ref string)
Used for additional custom parsing. By default, there is a command in this method that can insert the raw contents of one passage into the very start of all others. This can be useful if you have to define a different font for a different language!
Custom Command Parameters
commandInsertString
internal string Parser.commandInsertString
When running a custom command, write a value to this string to have it be inserted into your parsed text.
debugInsertString
internal string Parser.debugInsertString
Same as commandInsertString, but meant for debug messages.
Internal Methods
These following methods are only useful if making custom commands, and are marked as internal.
IsVariable
internal bool Parser.IsVariable(string x)
True if a string begins with $
IsNegatedVariable
internal bool Parser.IsNegatedVariable(string x)
True if a string begins with -
VariableName
internal string Parser.VariableName(string x)
Returns a string with ! or $- removed from the start.
Enumerators
Operator
Parser.Operator.To
Parser.Operator.Equal
Parser.Operator.NotEqual
Parser.Operator.Less
Parser.Operator.Greater
Parser.Operator.LEqual
Parser.Operator.GEqual
When coding your own parser, these operator enums can be used! It might be easier to check out the included sample code to see how to do this specifically.
Notes
Variables should only have alphanumeric characters & underscores in them.
Visited Array
The visited Array is a unique class that Fleece uses to track what passages have been visited in a story. It's important to understand how to use this class if you intend to make a game with saving/loading functionality, or any game that makes use of the <<if #PassageName>>/<<if #PassageID>> tags.
The visited array contains a list of passage IDs for passages that have been called with Begin() through the drawstring class. This includes passages that were accessed through links.
In your dialogue, you can use <<if #PassageName>> or <<if #PassageID>> in place of a normal variable if statement to check if this passage has been visited. Because this just saves IDs, everything still works even if a user changes language mid-game. There should only be one visited array scriptableobject in your project, as it's shared across all stories.
When saving/loading your game, to save this visited data, you can use Unity's JSON utility to save/load the VisitedArray to Application.PersistentDataPath.
Even if your game doesn't have saving/loading, make sure to call Story.settings.visited.Reset() to clear the array when your project starts in order to clear editor data.
Methods
Reset
void VisitedArray.Reset()
Clears all saves passage IDs. It's reccomended to call this under Awake()/Start() in your project's main Drawstring with Story.settings.visited.Reset().
MarkVisited
void VisitedArray.MarkVisited(Passage passage)
Saves a passage's ID as visited if it isn't already marked as such. This is automatically invoked when using Drawstrings.
HasVisited
bool VisitedArray.HasVisited(Passage passage)
bool VisitedArray.HasVisited(int passageId)
bool VisitedArray.HasVisited(string passageName)
Returns true if a passage's ID is marked as visited.
These will probably not get used in your own code, as the <<if #PassageName>>/<<if #PassageID>> tags are the primary ways to use this.
FAQ
Why are character names/portraits parsed by a drawstring, not by the parser class?
What if your game has more than one type of way text can be parsed? Text can be used not just in dialogue, but in a pause menu. Also in some cases, a game might want to show different portraits based on context such as my own game Star Cross, where a different set of character portraits are used for the Rail Shooter/Dating Sim segments.
What makes this different from another dialogue system?
Integration! Fleece was written from the ground-up to fit into Unity's workflow. The loose connections passages jumpers provide, especially when it comes to localization are personally invaluable. It also feels great to be able to write dialogue for a character directly in the NPC's class and then have it automatically saved!
I'm using the Generic Jumper, but text isn't updating!
Make sure "Editor and Runtime" is selected in the UnityEvent!
I'm using a custom Jumper, but text isn't updating!
Make sure your class has [ExecuteInEditMode] at its top, and uses the IJumperValidateable interface!
Unity is crashing every time I open the Fleece editor window or open the inspector of an object with a Jumper!
The root folder of your active story got configured incorrectly. Open up your story through its ScriptableObject in the project folder, and under the "Folders" foldout, make sure the first folder has an empty name and it's "folderID" is set to -1. If this value got set to 0, an infinite loop is happening when Fleece tries to determine the root folder's full name.
I can't see links, colours, or the delete button in the passage inspector!
Within settings, adjust the "Hi Res Monitor Fix" value until its lined up to your liking! On some computers, this value might have to go very high! This is to fix what I believe to be a bug related to 4k/retina displays in Unity. If you have any further information that could fix this without needing to adjust a value, please send me an email!
Help! My custom jumper keeps saying "Assertion Failed"?
Your script is probably missing the [ExcecuteInEditMode] bit at the top!
License
Hey! Time for the boring, yet important stuff.
First of all, as this is a Unity 'Editor Extention'-category Asset, it is one license per-seat, as dictated by the standard Unity EULA in section 2.3.2.
Next, if you use Fleece in your game, please put it in your game's credits! You can credit it multiple ways, but here's some examples:
ASSETS USED

Fleece by Kai Clavier (kaiclavier.com)
Or if you don't want to mention used assets, maybe something like this:
ADDITIONAL PROGRAMMING

Dialogue & Localization Programming by Kai Clavier (kaiclavier.com)
Finally, please send me an email through my website, kaiclavier.com that your game uses Fleece, because I want to see it!
I'll also add your game to this list of games that use my assets! Unfinished/in-production games are welcome, too!
Known Bugs
- Bottom of passage inspector gets pushed off-screen on some monitors. 4K monitors only? There is a variable in the settings menu to adjust this with until a permenant fix is found!
- Editing stories on other operating systems might cause compatibility issues. To fix a corrupted file, open it in a program like notepad, and replace "\u2026" with "..." and "\u2019" with "'".
Changelog
v1.0.0
- Initial Release!
v1.0.1
- The IJumperValidateable interface now uses ValidateJumper() instead of OnValidate().
- Moved around some files in the directory.
- Prevented warnings from appearing in the console.
- Updated EventType.mouseMove to MouseMove.
v2.0.0
- Added CSV export and import! Check out the section on exporting to and importing from CSV in the docs for more info! Long story short, you can now create, delete, spellcheck, and localize passages in an external CSV editor!
- Major overhauls to the Drawstring class. You will need to update your scripts!! Here's a basic rundown for people doing updates:
- Drawstring now doesn't inherit from MonoBehaviour, and instead can work inside a monobehaviour, similar to the Jumper class.
AllowGraphics()is removed, the drawstring doesn't care about graphics now, only retrieving text.FindAvailableLinks()is no longer a public method, it is only used internally.RunCommand()is nowRunCommandEvent. Subscribe to it withOnEnable()and unsubscribe withOnDisable().- A drawstring can now return a single choice, and it's up to the user to decide to automatically follow it or not.
- When a null link is followed, this now returns an empty string (to end a dialogue chain) instead of trying to parse a null passage.
OnTextDoneReading()is nowGetChoices(). It returns astring[]that can be used together withMakeChoice().Begin()andContinue()are virtual methods now, and can be overridden to change default functionality.- Check out the sections on drawstrings in the documentation for more info, and check out the sample scene scripts for examples!
- Created a generic drawstring class, which calls UnityEvents.
- Fixed Fleece not compiling in a build.
- Fixed selection box showing up when dragging the window around.
- Fixed Fleece returning an error when targeting WebGL.
- Added a notes field to passages, for adding localization notes, etc. If passages have notes attached, they display a banner!
- Hopefully fixed the 4k monitor bug. There's a new variable in settings, "Hi Res Monitor Fix" for adjusting the problem as a temporary fix.
- Changed default id max to 99999, down from 9999999. This is for easier CSV passage creation. (It's easier to type 100001 than 10000001, and 99999 is still a LOT of passages.)
- Added a help box that shows controls in the top-right of the Fleece Editor window. This can be disabled in settings.
- Added an option to focus keyboard control to the raw text field when selecting a passage. If this didn't auto-select all text, it would be the default behaviour.
- Added an example scene that shows a simple "text log" style of dialogue.
- If no story is selected in the Fleece Editor window, a button to create a new story is shown.
- A Story's ScriptableObject inspector now has a button that will set it as the active story.
- The Generic Jumper can now be added to a GameObject through the add component menu, under "Fleece/Generic Jumper".
- Created links have empty names by default, now. This is because drawstrings can react differently to links with empty names. This behaviour can be changed in settings.
- Both Parser's and Drawstring's
RunCommandmethods now include the passage the command was run from, allowing you to grab variables from the passage for custom commands. - Fixed a custom commands being on their own lines causing an error.
v2.0.1
- Added a "passage font color" variable to settings.
- Jumpers now work properly on ScriptableObjects.
- Jumpers now invoke
ValidateJumper()as theIJumperValidateableinterface dictates instead ofOnValidate(). - Added an extra check to drawing note banners in the editor, preventing a rare error.
- When running a command on a link, the passage the link is on is passed as a variable now. This can be used to dynamically have a command react to the amount of links on a passage! Added a "linkcoin" command to DefaultParser.cs that uses this.
v2.0.2
- Uploaded an STMDrawstring script to the forums.
- Clicking on side panel will no longer deselect passages/folders if a field is misclicked.
- SetDirty() calls now use more editor-exclusive code. (Minor cleanup)
- Jumpers work within lists/arrays now.
v2.1.0
- Added a default Restore() override to Drawstrings so it can be invoked with UnityEvents.
- Added Restore() to Generic Drawstring.
- Jumpers now update when the story changes via code, in addition to in-editor now.
- Fixed some errors popping up when they shouldn't.
- Added a "linebreakStrings" variable to parsers. This lets you define strings that will automatically be replaced with linebreaks by Fleece. The default values are "\n" and "
<br>". - Added an option to render the arrows between passages as bezier curves. The direction they exit and enter from can be configured, alongside how much they bend.
- Fixed Fleece sometimes forgetting active story upon startup.
- Added an "IDrawstring" interface and added it to included drawstring classes. It's not needed to make drawstrings work, but makes them grabbable by playmaker actions and other external scripts.
- Added a Begin(string) override to the Drawstring class.
- Wrote new playmaker actions! They'll be available in a pinned post at the top of the forums soon.
v2.1.1
- Fixed Fleece not compiling in a build.
v2.1.2
- Drawstring's _passage variable is now protected instead of private.
- GenericDrawstring is now included in Scripts instead of Sample.
- Fixed various bugs with GenericDrawstring and upgraded it's functionality to allow for zero-coding dialogue systems.
- Fixed Drawstring bug where link lists or passages weren't initialized.
v2.1.3
- Fixed
<endif>missing one character. - When the editor window is open, Fleece no longer constantly changes the story field.
- Changing the story now automatically updates all Jumpers in builds. (This was only happening in-editor, before)
- Fixed CSV export exporting the "notes" field incorrectly.
- Fixed CSV import importing stories with base stories incorrectly.
- Data in the default parser has an initial value now.
- Added a ResetAllData method to the default parser.
- This ResetAllData method can be called with a button in the default parser's inspector.
v2.1.4
- When importing a CSV for a story with a base story, a passage/link containing a different, non-empty string is no longer a requirement for it to be marked as an override, since some languages use loanwords from others. (eg. "volume" in English is "volume" in Dutch) Localizers should be told to leave the text/link fields blank if there should be no traslation from the original in terms of programming tags, not words that happen to be identical.
- Fixed CSV import ignoring the final character of the final column.
- Fixed CSV import halting if a row has a different amount of columns than the header row.
- Added a CustomParse() method to parsers, and default behaviour of inserting the raw contents of a defined passage into the start of every other passage.
v2.1.5
- Jumpers now work in child classes and lists of child classes.
v2.1.6
- Custom commands are now parsed before all others, allowing for more dynamic parsing.
- Added a "csv sort title" option to CSV export settings. If an exported CSV is sorted by theis column, then passages can be sorted by Folder/Subfolder/Title. This means a more logical organization for translators will be possible.
Fleece by Kai Clavier [kaiclavier.com]